
Virtualmin on a VPS: Installation and Your First Site

Virtualmin is a free VPS control panel: sites, databases, certificates and backups are set up from the browser. Below is installing Virtualmin on a UFO.Hosting VPS from a clean system to a first WordPress site. If you are still choosing a panel, start with the overview “Which control panel to choose”.
The order is this: you take a clean VPS on Ubuntu 24.04, set the server name in the form of a domain, run the official script with the options --bundle LEMP --type mini (it finished in 3 minutes for us), log in at https://IP:10000, create a virtual server for the domain, issue a Let’s Encrypt certificate and install WordPress right from the panel. After installation the firewall is different: UFW is gone, and port 10000 is open to everyone.
We went through every step on a test server: Ubuntu 24.04, 2 vCPU and 4 GB of memory, Virtualmin installer 8.2.1, Virtualmin panel 8.3.0 GPL and Webmin 2.670. The screens and output are real; the addresses and passwords in them are test ones.
What Virtualmin is and how it differs from Webmin
Virtualmin is a hosting panel: for every domain it creates a “virtual server” with its own user, site folder, database and certificate. Webmin is the administrator’s web interface for the Linux system itself (packages, services, firewall). Virtualmin works as an add-on on top of Webmin, so they are installed together and open at one address.
There are two editions. GPL is free and covers typical tasks: virtual servers, databases, Let’s Encrypt certificates, backups and application installers (GPL has nine, including WordPress and phpMyAdmin). Pro is paid: in the GPL menu these items are marked with a lock, for example batch server creation, backup encryption, load graphs, reseller accounts and more application installers. GPL is enough for a first site.
Is the memory on your plan enough
The Virtualmin documentation divides installation into two kinds. The full one (mail, spam filter, antivirus, its own DNS, FTP) needs, in their words, “about 4 GiB”. The minimal one (--type mini) removes all of that. After a minimal installation and one WordPress site we had 807 MB of 3916 MB in use. Separately: SpamAssassin easily takes 1 GB and ClamAV 2 GB or more, and mini has neither.
| Plan | Resources | How to install |
|---|---|---|
| Naos | 1 vCore, 1 GB, 25 GB NVMe | Mini only and one small site; we did not test on 1 GB, there will be almost no headroom |
| Haedus | 2 vCore, 2 GB | Mini, several light sites |
| Brachium | 2 vCore, 4 GB | Mini with headroom (our test size) |
If memory runs out, you can change the plan. To choose right from the start, see the plans on the VPS page.
Which OS fits and two ways to install
The installer shows a list of the systems it supports: Debian 12 and 13, Ubuntu 24.04 and 26.04 LTS, and RHEL, AlmaLinux and Rocky 8-10. Ubuntu 22.04 is not on this list. The main condition: the system must be clean. Virtualmin installs the web server, PHP and the database itself, and a pre-installed nginx or MySQL gets in its way.
Option A. When you order a Linux VPS on any plan, choose the Virtualmin panel in the list (next to Vesta, Hestia, CyberPanel, ISPmanager): the server arrives with the panel, so go to the first login. Option B. Order a clean Ubuntu 24.04 and install by hand — longer, but you choose the components yourself. It is described below.
Step 1. Preparation: updates, server name, root password
Connect over SSH as root and update the packages.
apt update && apt -y upgradeOn a freshly created server the system installs updates in the background and holds the package manager lock. If the command or the installer seems to “hang”, wait a few minutes.
Set the server name in the form of a domain (FQDN). Our name was hiplet-135110, not a domain. At the Configuring SSL for the hostname step the installer showed a warning, and when the first site was created Let’s Encrypt refused: the owner address came out like user@hiplet-135110.., and the certificate authority considered it invalid. To avoid repeating that, set the name right away. Substitute your own domain and the server IP.
hostnamectl set-hostname panel.example.com
echo "203.0.113.10 panel.example.com panel" >> /etc/hosts
hostname -f
The first command sets the name, the second adds it to /etc/hosts so the system finds itself without DNS, the third checks. You should see one line, panel.example.com. The A record panel pointing to the IP is created the same way as for an ordinary domain.
The root password. You log in to the panel as root with the system password. If you connect to the server only with a key and don’t know the password, set it with the passwd command. If login still fails, the Webmin password can be set separately: /usr/share/webmin/changepass.pl /etc/webmin root NEW_PASSWORD.
Step 2. Run the official install script
Download the installer from the developer’s site. The -fsSL options make curl stay quiet and fail on an error instead of saving an error page in place of the script.
curl -fsSL -o virtualmin-install.sh https://download.virtualmin.com/virtualmin-install.sh
sh virtualmin-install.sh --bundle LEMP --type mini
--bundle LEMP— the nginx web server;LAMP— Apache. Take LAMP if the site needs.htaccess: nginx does not read it;--type mini— without local mail, spam and antivirus filters, its own DNS and FTP. We don’t set up mail: outgoing port 25 on a UFO VPS is closed until the account is verified;- the full list of options is shown by
sh virtualmin-install.sh --help; it includes, for example,--hostname(set the name during installation) and--swap(the swap file size).
The installer prints a greeting with the list of supported systems and tells you how much space is needed (up to 1 GiB for mini) and that a 3 GiB swap will be created. Swap is a paging file on disk, insurance against running out of memory, not a replacement for it. The script asks Continue? (y/n): answer y.
Then it goes through four phases: Check, Setup, Installation, Configuration, and in the last one prints 11 lines like [1/11] Configuring AWStats. The whole thing took about three minutes for us. The line [9/11] Configuring SSL for the hostname ended with a warning icon: that is the non-FQDN name from step 1. At the end you will see [SUCCESS] Installation Complete! and the panel address: https://server-name:10000 or https://IP:10000. Don’t close the SSH session during the installation.
Step 3. Log in to the panel and go through the setup wizard
Open https://IP:10000 (port 10000 is the shared entry for Webmin and Virtualmin). The login is root, the password is the system one. The browser will most likely warn about an untrusted certificate: the panel starts with a self-signed one. Encryption still works, so continue manually.
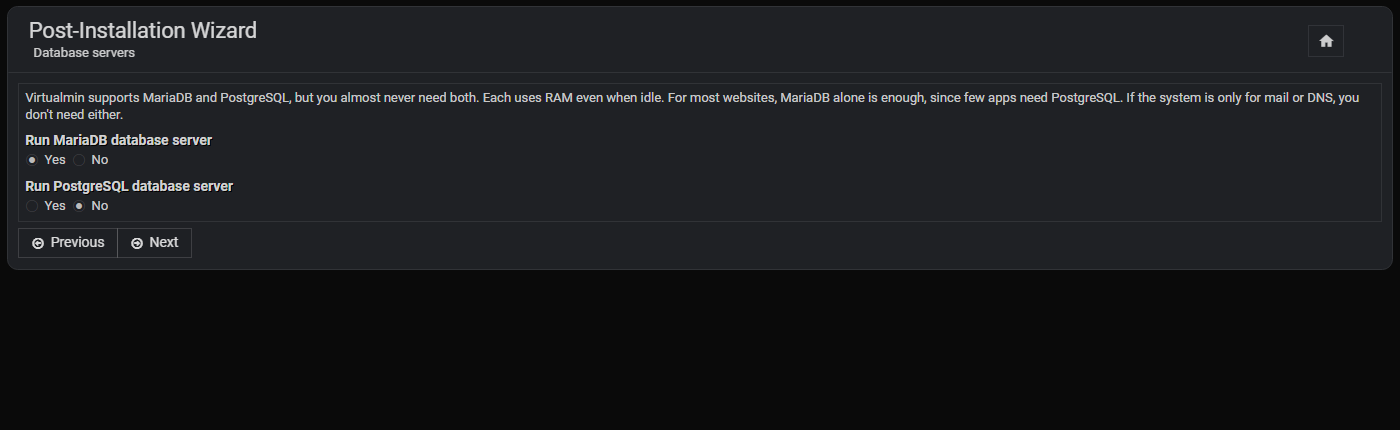
The Post-Installation Wizard starts. With the mini type it has only three screens: the greeting, the choice of databases and “All done”. On the Database servers screen you are offered to run MariaDB (Yes by default) and PostgreSQL (No by default). Leave it like that: WordPress sites need only MariaDB. Click Next, then Finish.
Don’t turn MariaDB off. When we tried the switches at this step, answering No for MariaDB stopped the database service and disabled it in the Virtualmin settings; WordPress sites will not work without it. If you clicked by mistake: systemctl enable --now mariadb and repeat the wizard through the Re-Run Install Wizard item in System Settings, choosing Yes for MariaDB.
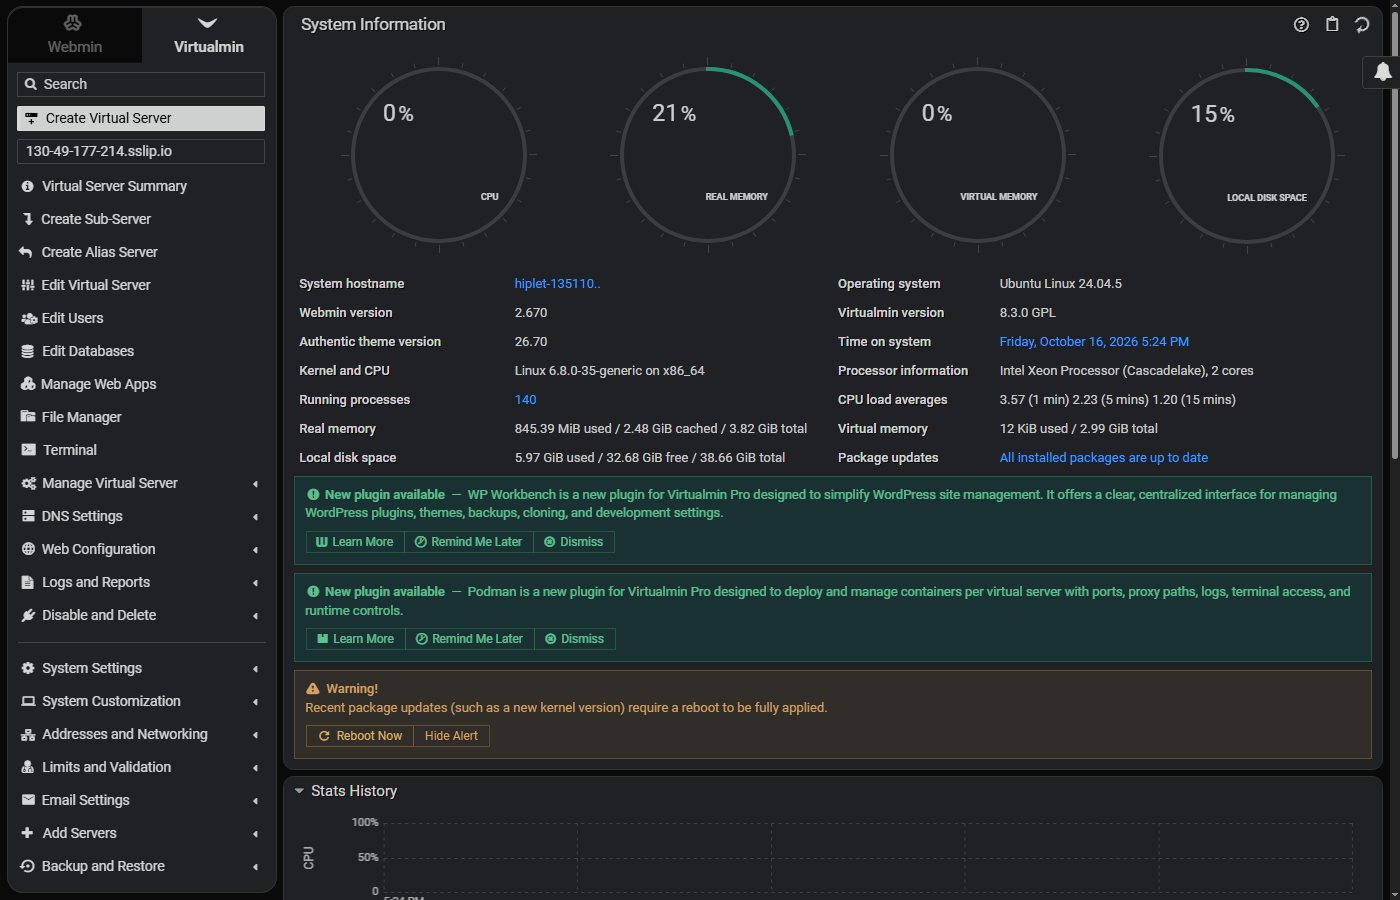
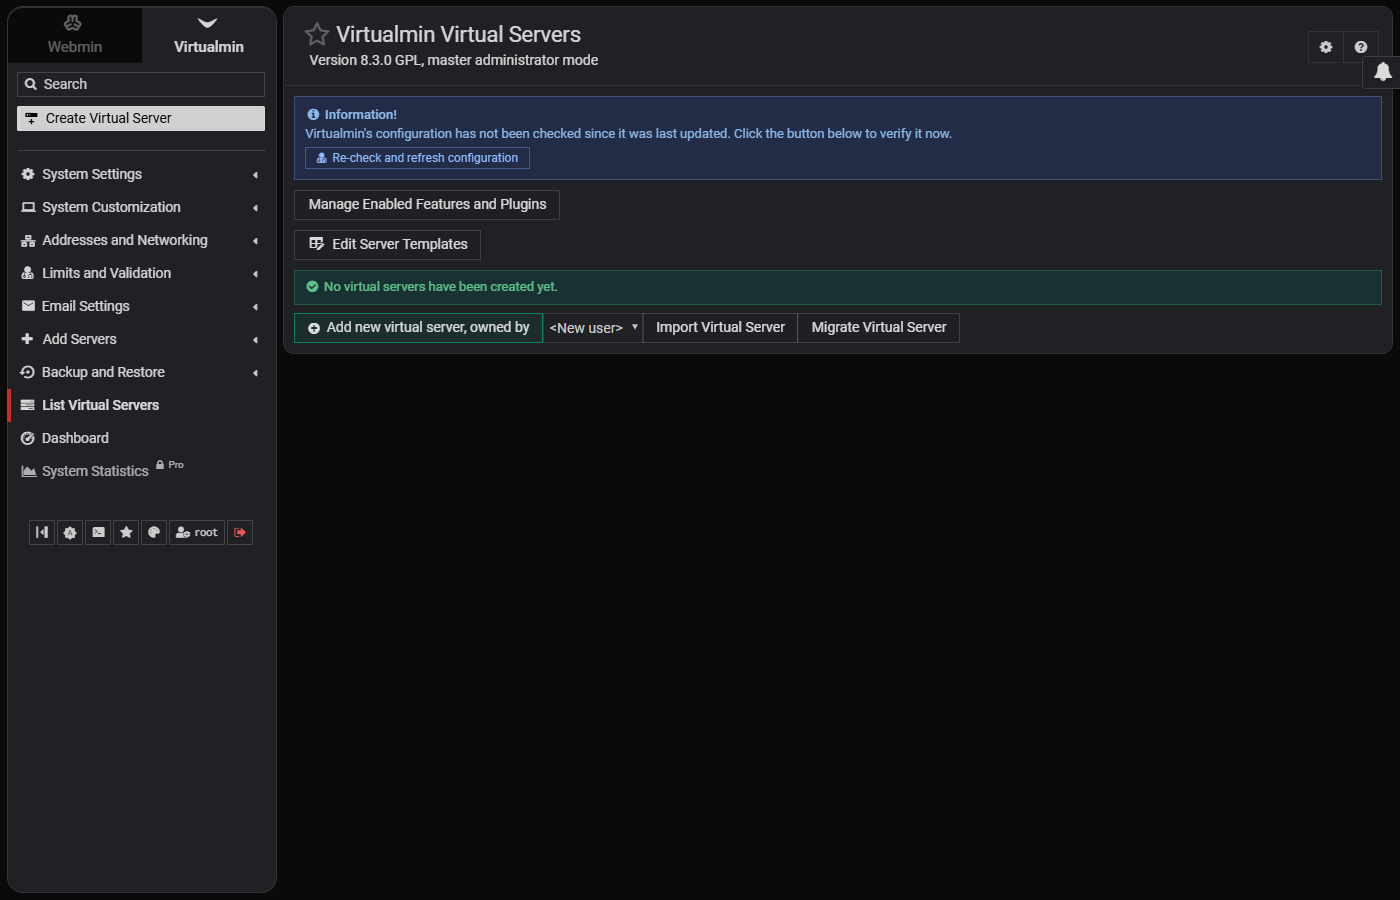
You will see the main screen Virtualmin Virtual Servers and a blue banner saying the configuration has not been checked for a long time. Click Re-check and refresh configuration. The panel goes through the list and at the end writes .. your system is ready for use by Virtualmin. The list shows versions: ours had PHP 8.3 (php8.3-fpm), MariaDB 10.11, and the nginx and AWStats plugins. The orange line Quotas are not enabled on the filesystem / is not an error: it refers to disabled disk quotas on home directories, which a site does not need.
Step 4. Create the first virtual server
On the main screen click Add new virtual server, owned by <New user> (or Create Virtual Server in the left menu). The form:
- Domain name — the site domain, for example
example.com(if you have no domain, you can register one at UFO.Hosting); - Description — a label for yourself; it also becomes the site name in WordPress;
- Administration password — the site owner’s password, needed for SFTP;
- Server configuration template and Account plan — Default Settings and Default Plan are enough;
- Administration username — Automatic: the name is taken from the domain (ours was
one30-49-177-214); - Enabled features — four ticks:
Enable Nginx website,MariaDB database,Webmin login,AWStats reporting. On a weak VPS you can turn AWStats statistics off.
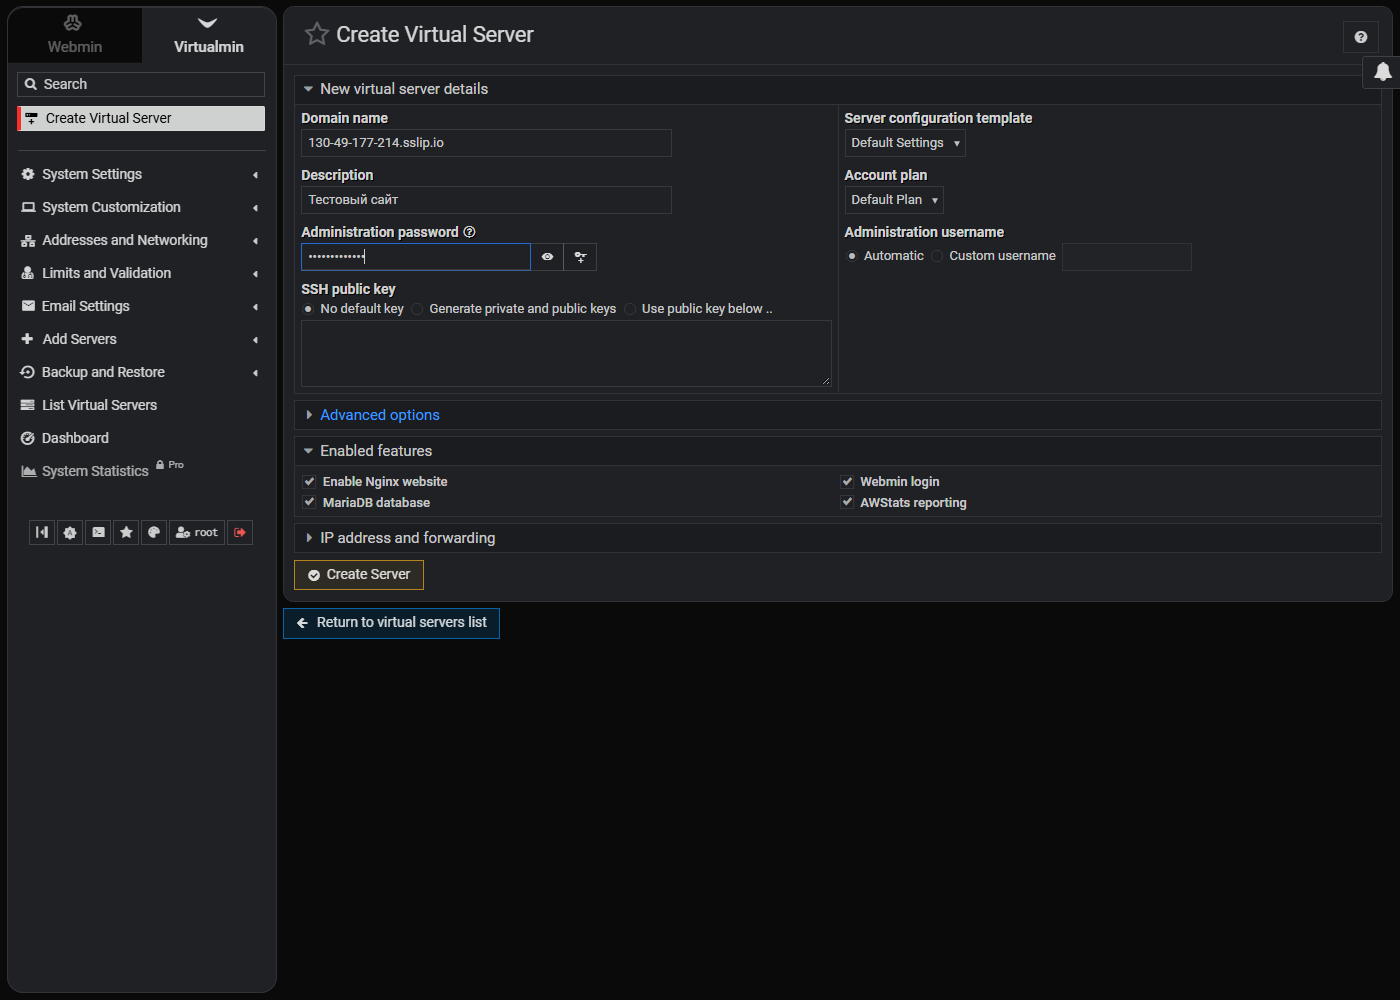
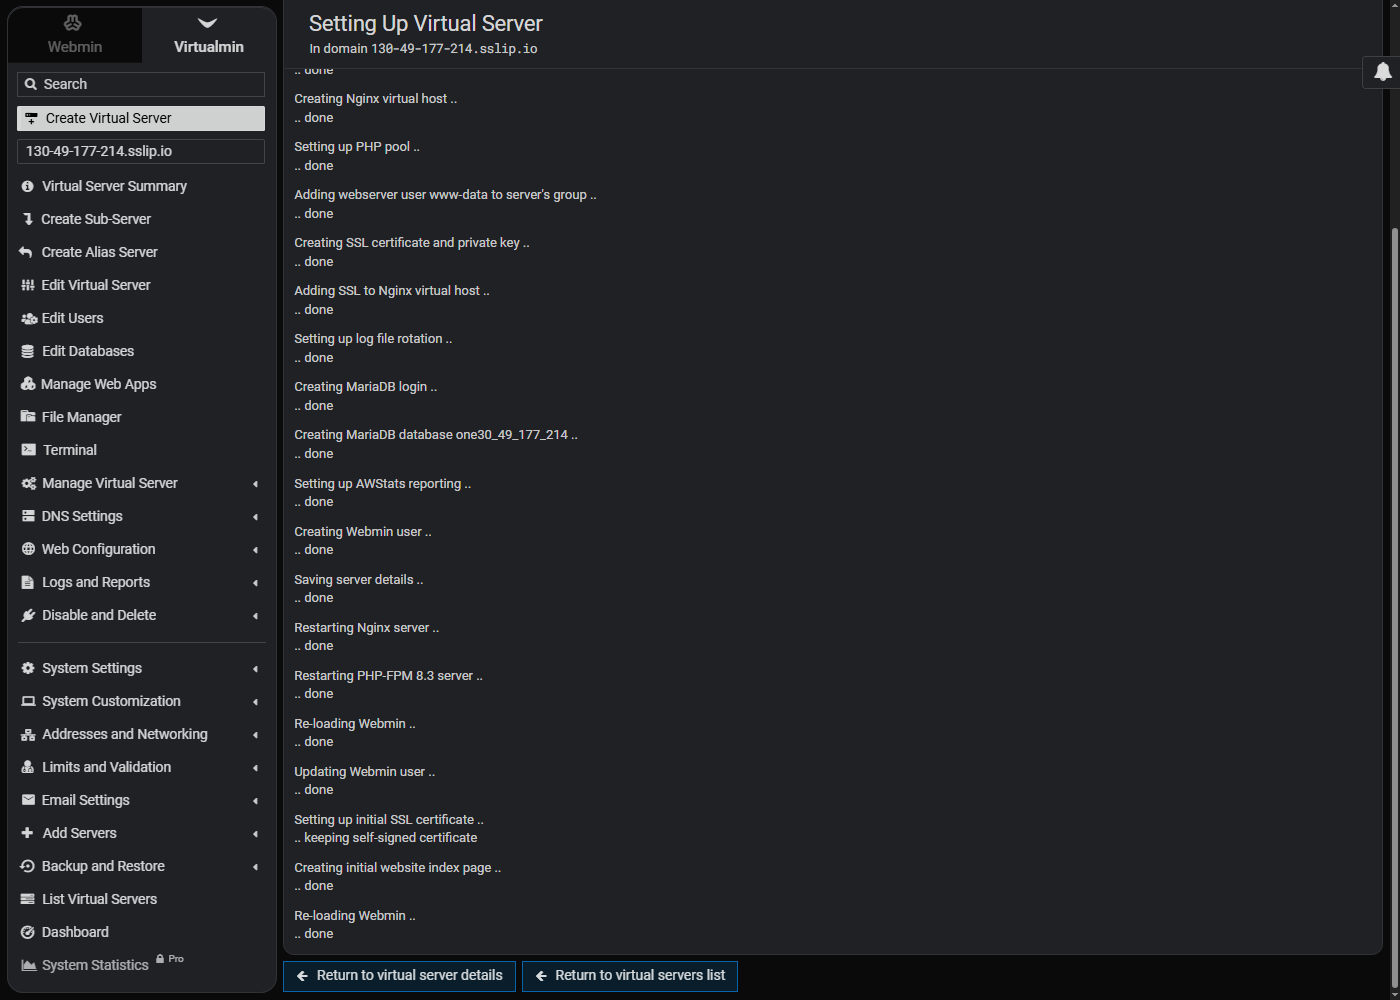
Click Create Server. A log appears: the user, the nginx virtual host, the PHP pool, the certificate, the database (Creating MariaDB database one30_49_177_214 in ours) and the services restart. The line Setting up initial SSL certificate .. keeping self-signed certificate means the site opens with a self-signed certificate for now. The site files are in /home/NAME/public_html, where NAME is the owner’s login.
Need a clean server for Virtualmin? The promo code WIKI15 gives 15% off a VPS order at UFO.Hosting.
Step 5. Point the domain and issue Let’s Encrypt
Create A records for example.com and www pointing to the VPS IP. Without them the certificate will not be issued: the authority checks the domain with a request to port 80. A DNS update takes from minutes to a few hours. Check:
dig +short example.com AYou should see your VPS IP.
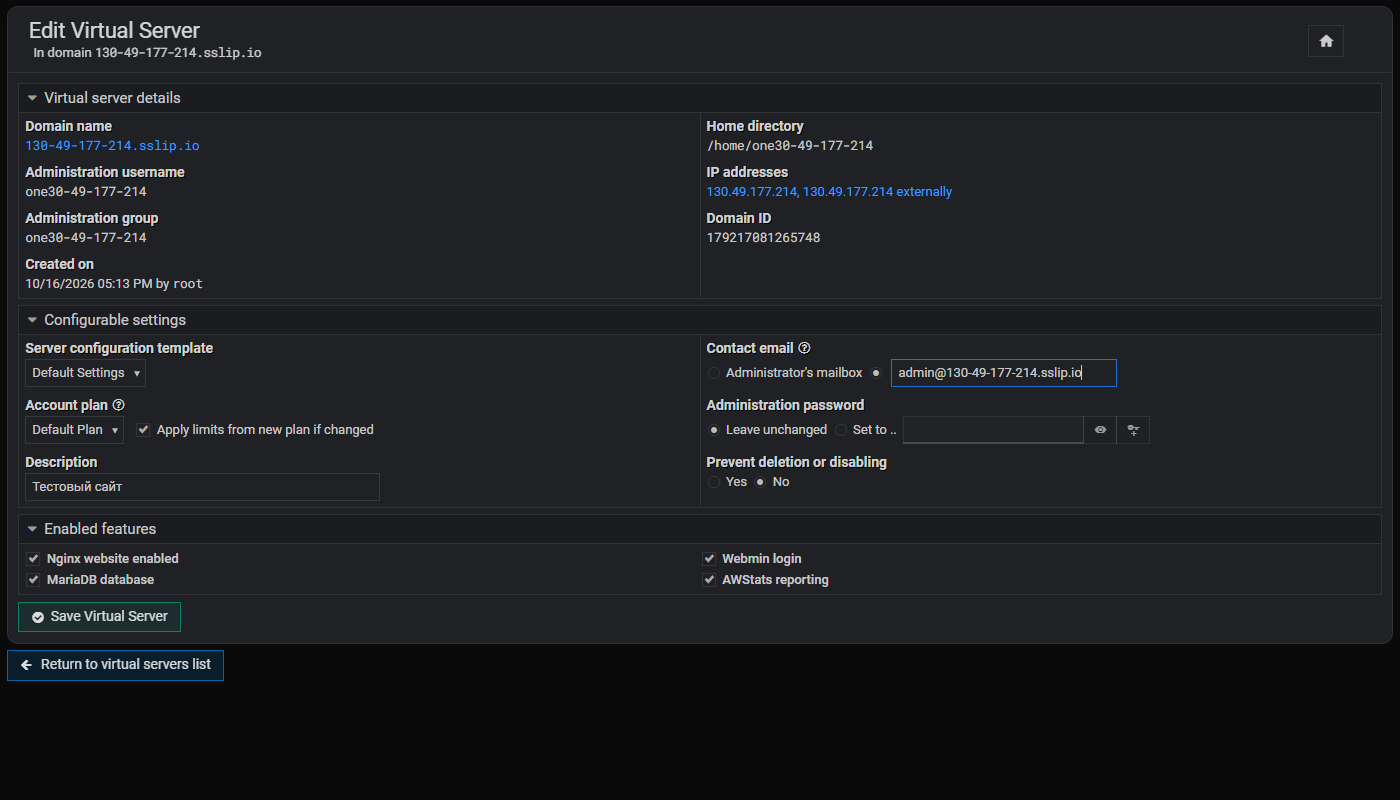
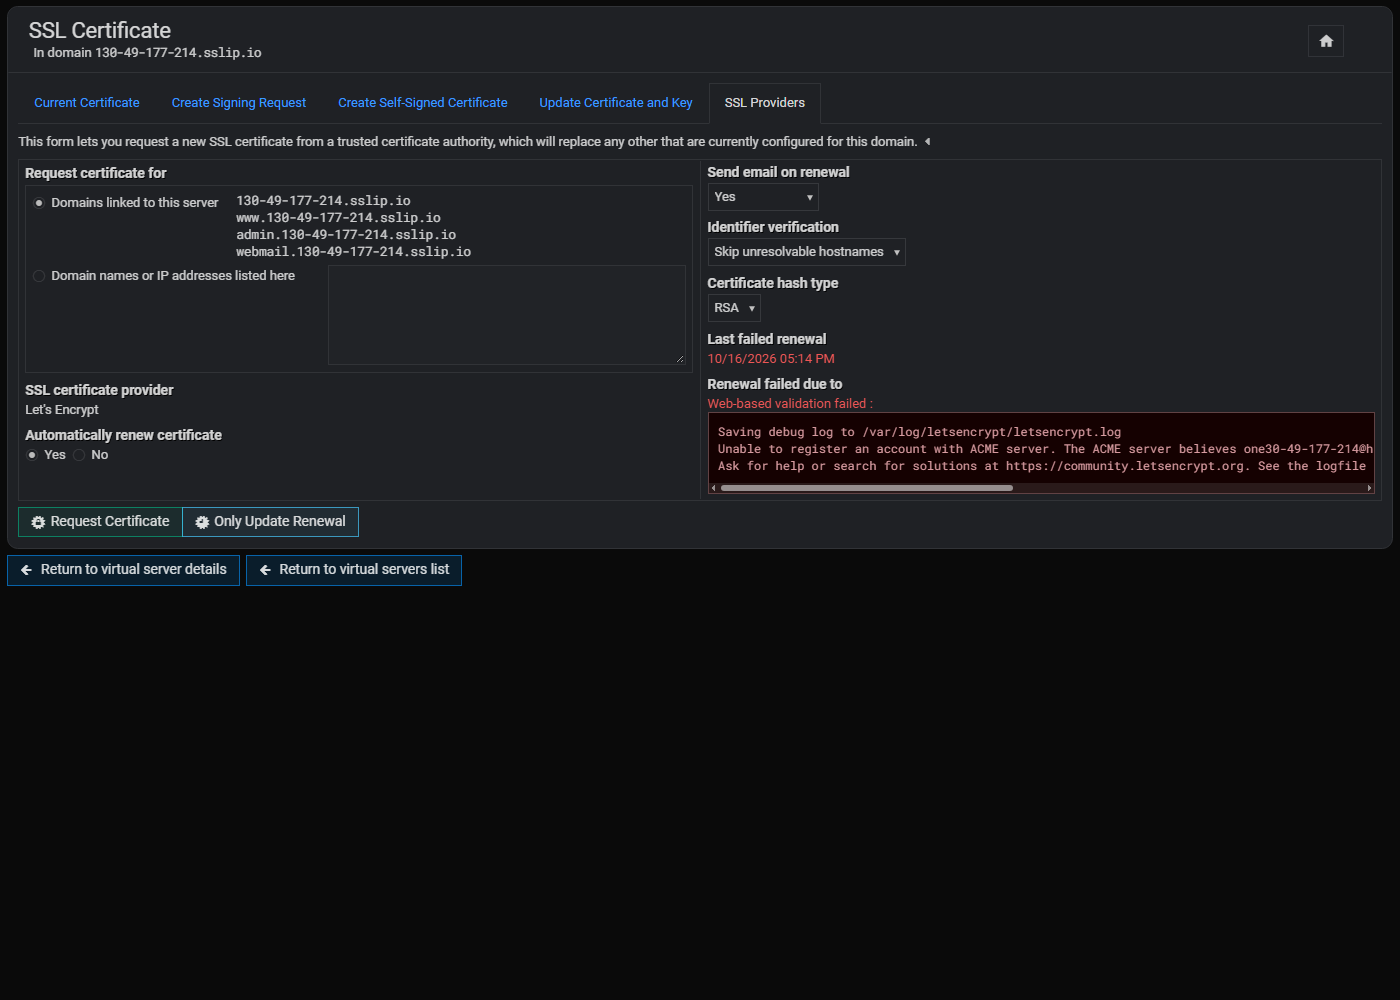
Check the owner’s contact address. If the server name is not a domain, as in our case, Virtualmin puts a non-working address on the owner and Let’s Encrypt refuses: in the SSL Certificate section on the SSL Providers tab, in the Last failed renewal block, there will be the text The ACME server believes ... is an invalid email address. It is fixed in two steps. Open Edit Virtual Server, for the Contact email item switch from the value Administrator's mailbox to the second field and enter a real address on your domain, then save with the Save Virtual Server button.
Then, in the virtual server menu, open Manage Virtual Server → Setup SSL Certificate (the page is called SSL Certificate), the SSL Providers tab. The default provider is Let’s Encrypt. The domain and the subdomains www, admin, webmail are already listed; switch Automatically renew certificate to Yes and click Request Certificate.
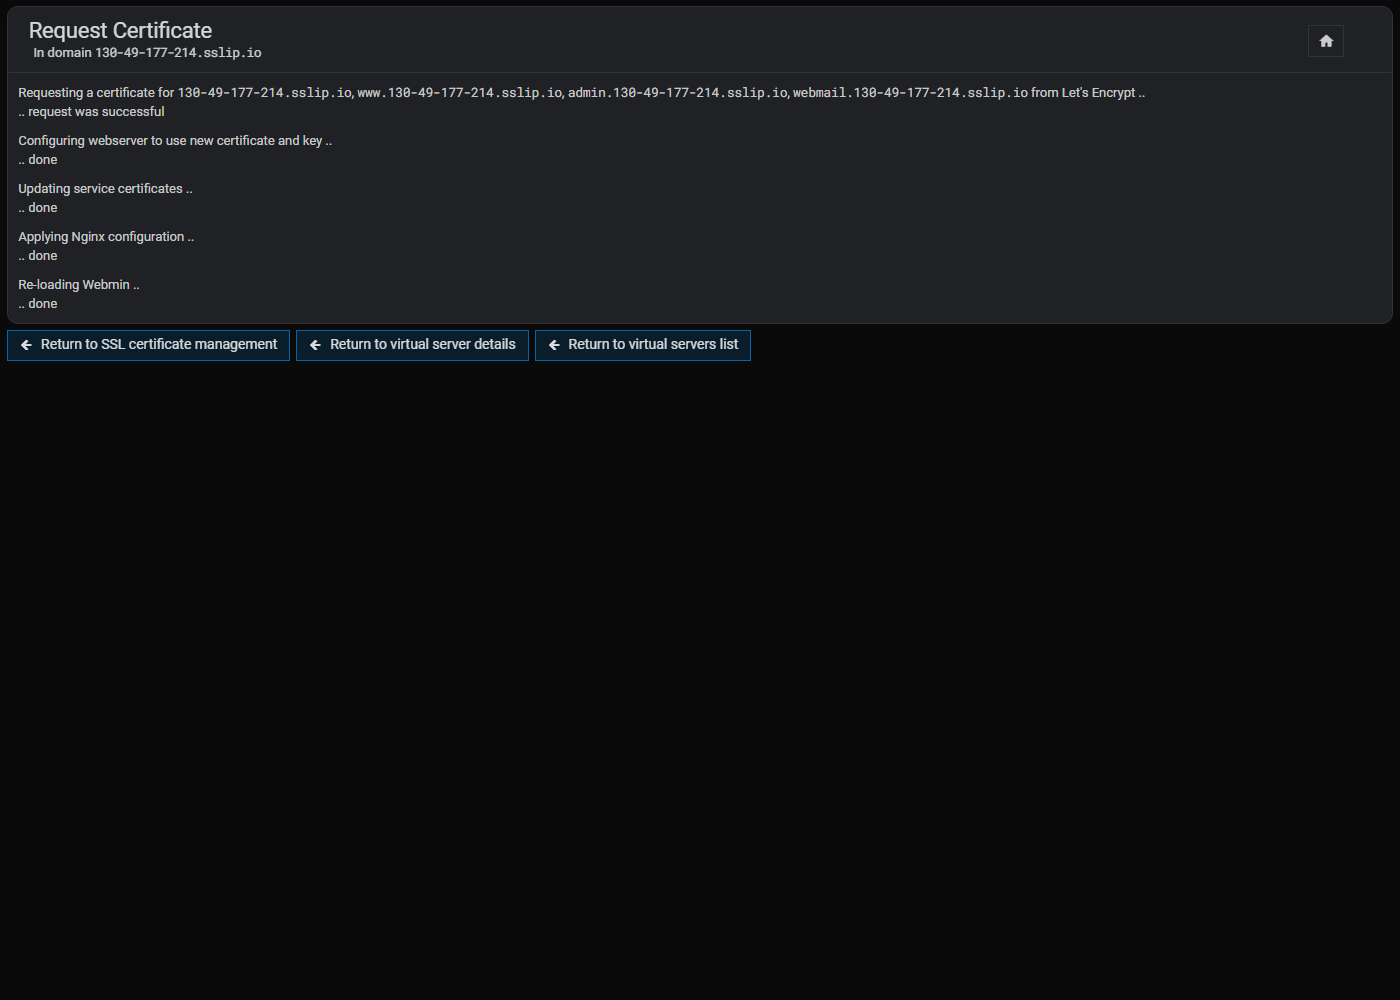
After a few seconds the panel writes .. request was successful, then Configuring webserver to use new certificate and key .. done and restarts nginx. Check the site without skipping the warning: https://your-domain should open with a padlock. Ours was issued by Let’s Encrypt, and the curl command without the -k option ran without errors. A verification error almost always means a wrong A record or a closed port 80.
Step 6. Install WordPress from the panel
Virtualmin GPL has a WordPress installer; you don’t need the paid version for it. Open the virtual server, then Manage Web Apps, the Available Web Apps tab. In the free edition nine applications are marked GPL: ClassicPress, Matomo, phpMyAdmin, phpPgAdmin, RoundCube, SquirrelMail, Tiki Wiki, WHMCS and WordPress (version 7.1.2 in ours). The rest are locked with a Pro label.
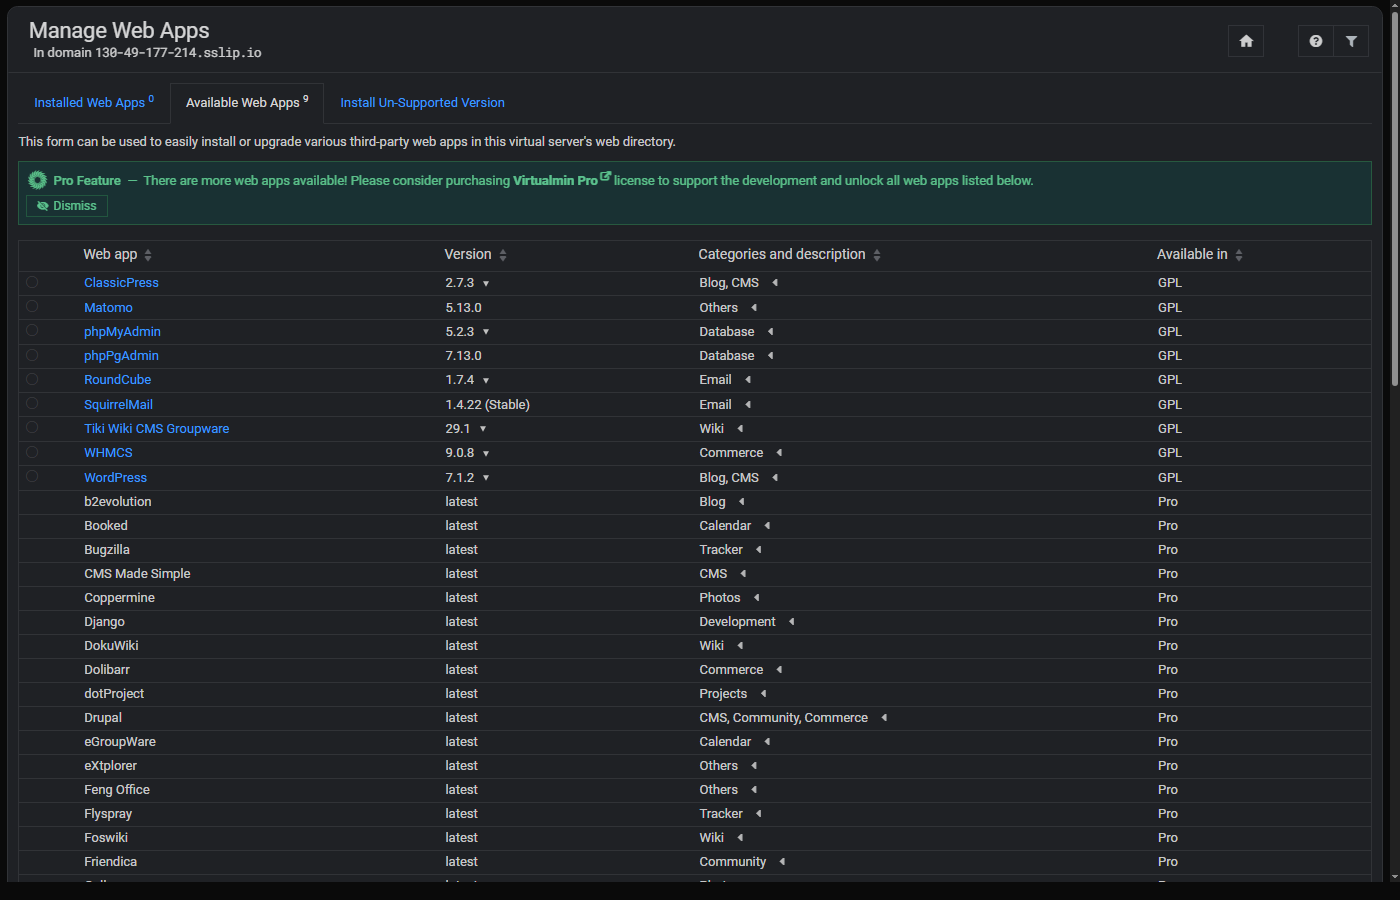
Tick WordPress and click the install button at the bottom of the list. A form opens:
- Database for WordPress tables — a new database (
one30_49_177_214_wordpressin ours), created by Virtualmin; - WordPress table prefix —
wp_, you can leave it; - Install sub-directory under public_html — by default WordPress goes into the
wordpresssubfolder, and the site opens at/wordpress. To make it the main site, chooseAt top level; - WordPress site name — the site title, filled in from the description;
- Initial login for web app — the login and password of the first administrator; the password is generated automatically.
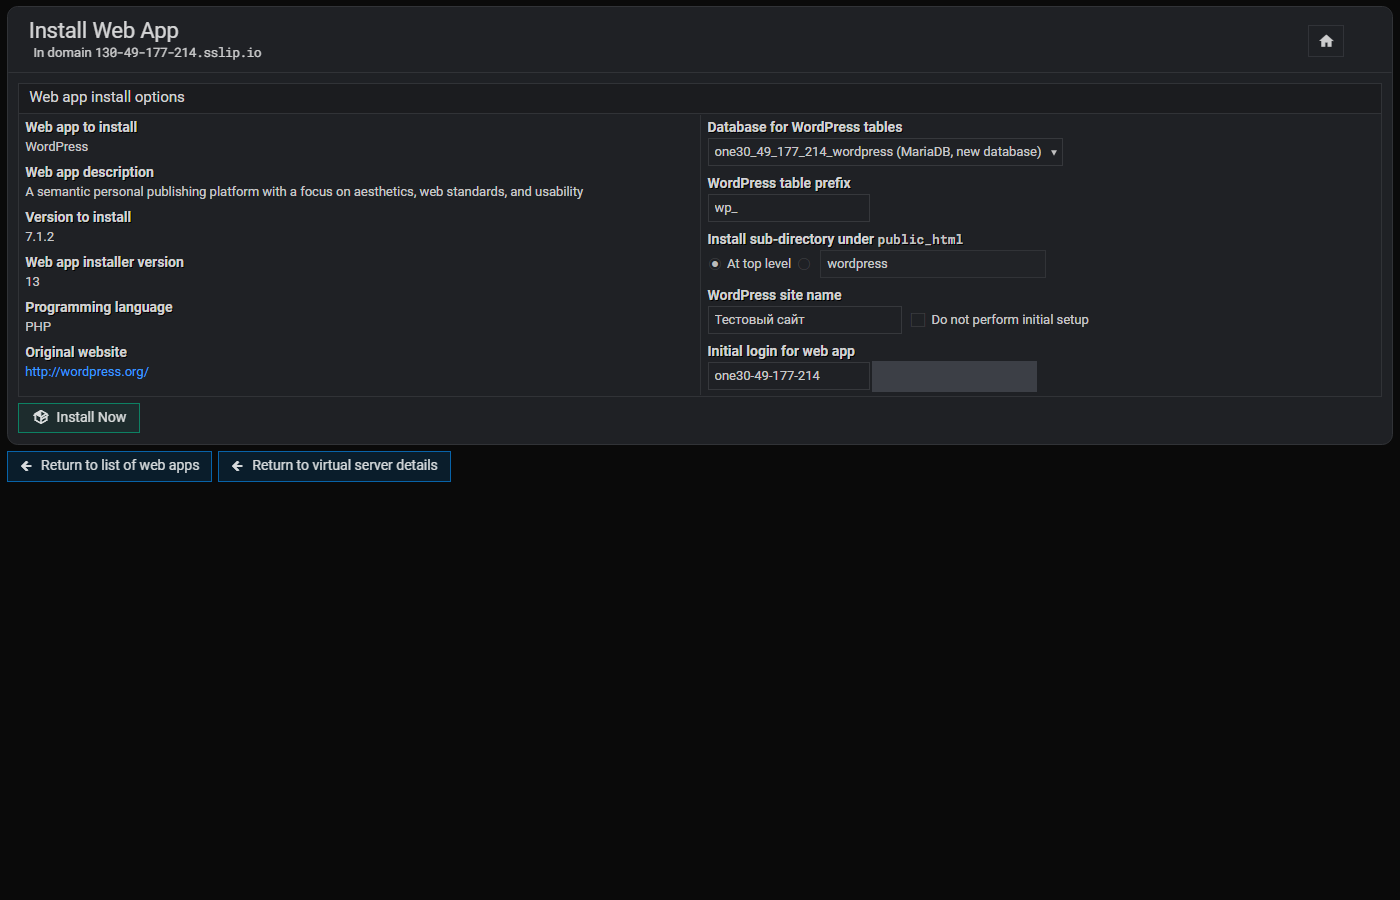
Click Install Now. The panel asks for confirmation: Are you sure you want to install WordPress into the directory /home/NAME/public_html? and warns that four files are already there (the site placeholder). Click Install Now once more. Then the panel downloads WP-CLI (about 7 MiB), installs the missing PHP modules (ssh2, imagick, zip in ours), reloads PHP-FPM and nginx and writes: WordPress installation completed. It can be accessed at https://your-domain/, followed by the administrator login and password. The password is shown only here, so save it and change it in the WordPress admin.
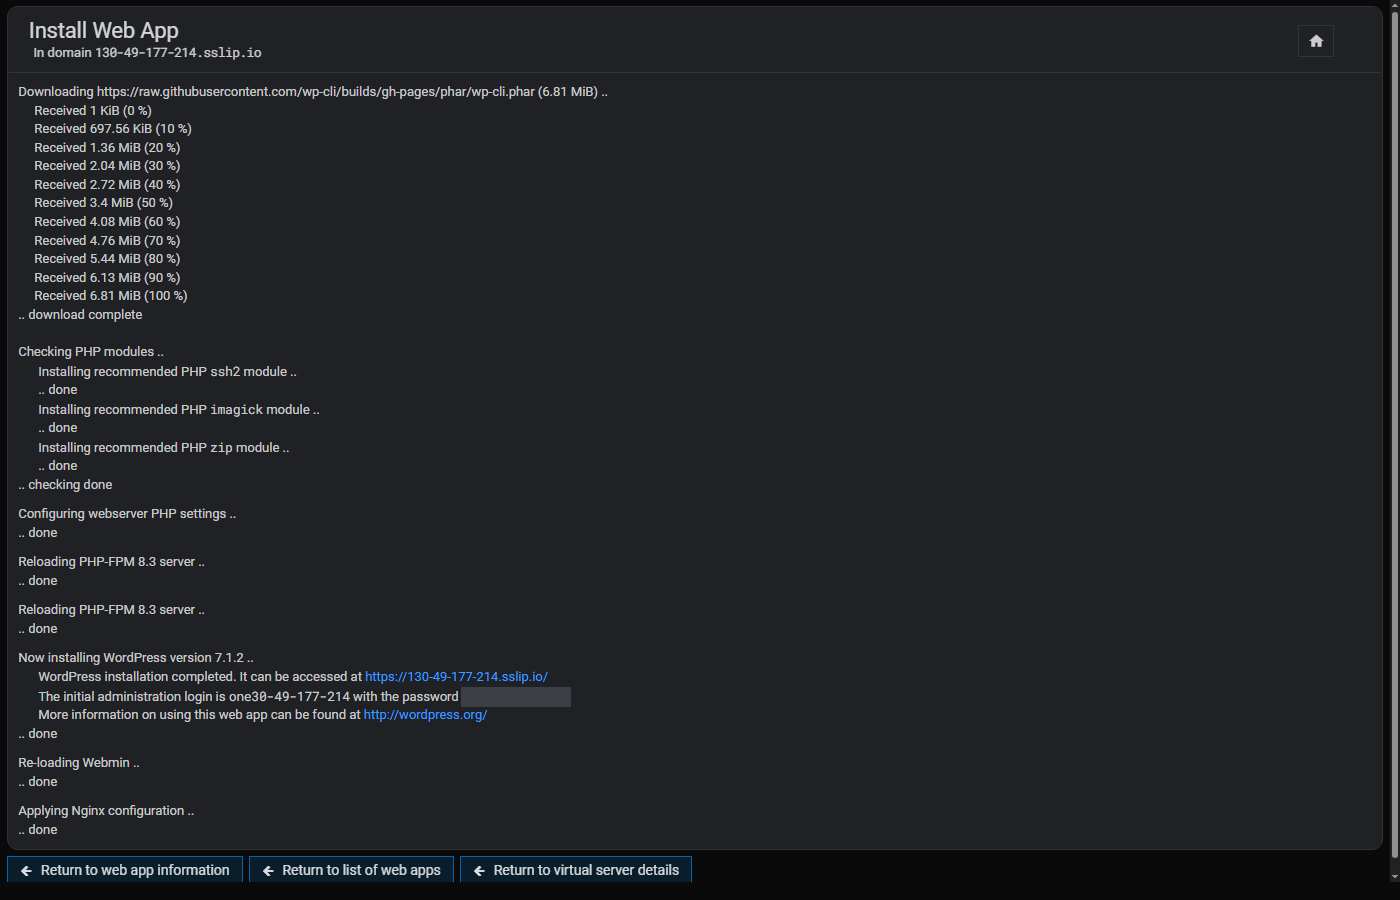
Open the site: ours immediately loaded the home page with the title we entered in the description, with no extra wizard. The admin area is https://your-domain/wp-admin. If you want WordPress without a panel, or with a stack set up by hand, see our articles on installing WordPress on a server and on a LEMP stack; for another panel, see CyberPanel and WordPress.
Files, users, PHP and backup
Upload files over SFTP (file transfer over SSH, port 22) as the domain owner: the owner has the /bin/bash shell set up, and password login worked on our image. The clients are the same as in our article on uploading site files to a server. FTP is not installed with mini, which is a plus: it sends the password in plain text. There are also the built-in File Manager and Terminal in the virtual server menu.
Create one virtual server for every independent site: each has its own system user, and a break-in on one does not open another’s files. Look at the PHP version in Web Configuration - PHP Options; on our server it was 8.3. Change it only if a plugin requires.
Backup: the Backup and Restore section → Backup Virtual Servers for a one-off copy and Scheduled Backups for a regular one. A copy on the same disk will not protect you if the server is lost: specify another server over SSH or external storage, and once a month try restoring to a test domain. Backup encryption is not available in GPL (the Backup Encryption Keys item has a Pro label).
The firewall: UFW does not work here
The main difference from plain Ubuntu: the Virtualmin installer removes UFW (after installation ufw status answers command not found) and turns on its own nftables rules in the table webmin_profile_hosting. The incoming policy is drop: everything is closed except the list. And the list is wide. Open to everyone:
- TCP: 20, 21, 22, 25, 53, 80, 110, 143, 443, 465, 587, 853, 993, 995, 2222, 20000;
- TCP: the ranges 10000-10100 (the panel and neighbours) and 49152-65535 (dynamic ports, for example for passive FTP);
- UDP: 53 and 443.
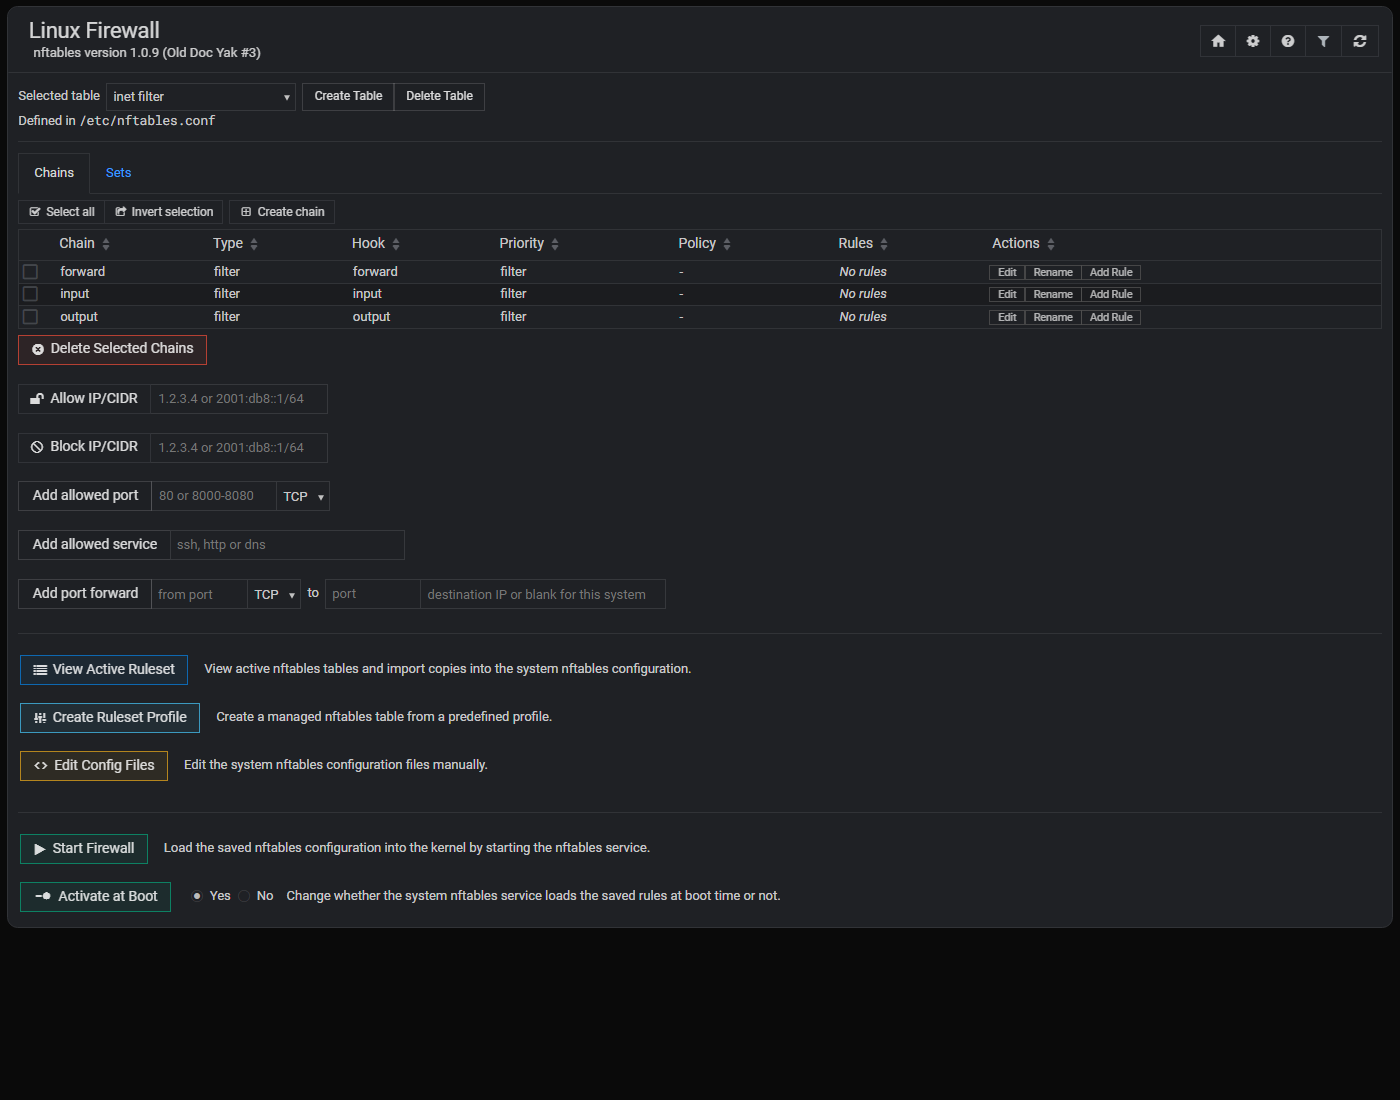
With the mini type nothing listens on the mail, FTP and DNS ports, so they are harmless. But port 10000 controls the whole server, and it is scanned around the clock. Open it only to your own IP. The rules are visible in the panel itself: in Webmin find the Linux Firewall module (nftables), the Chains and Sets tabs; on the module page the empty inet filter table is selected by default, so choose the table you need in the Selected table list.
Allow only yourself on 10000
Find your external IP (any “what is my IP” service) and substitute it for 203.0.113.10. We tested these two commands on a server.
nft delete element inet webmin_profile_hosting profile_hosting_tcp_ports '{ 10000-10100 }'
nft insert rule inet webmin_profile_hosting input ip saddr 203.0.113.10 tcp dport 10000-10100 accept- the first removes the 10000-10100 range from the common list of open ports;
- the second adds a rule at the start of the
inputchain: this port is open only to your address.
Check: from your address the panel answers, from any other the connection stays silent until the timeout, and the sites on 80 and 443 work. Such rules live only until a reboot, so save them to the file the nftables service reads at start. First a copy of the old file.
cp /etc/nftables.conf /root/nftables.conf.bak
(echo '#!/usr/sbin/nft -f'; echo 'flush ruleset'; nft list ruleset) > /etc/nftables.conf
nft -c -f /etc/nftables.conf && echo syntax-ok
The second line rebuilds the file: a header, the flush ruleset command and the current rules. The third checks the syntax and should answer syntax-ok. After that we rebooted the server and made sure the rule stayed and that the site and the panel worked.
If your IP changes, you will lose access to the panel. You can get it back over SSH with one command with the new address: nft insert rule inet webmin_profile_hosting input ip saddr NEW_IP tcp dport 10000-10100 accept (and save the file as above). The Webmin module and the Create Ruleset Profile item can rewrite this table, so recheck the rules after working with them. If you don’t want to edit the file by hand, go to the panel through an SSH tunnel ssh -L 10000:127.0.0.1:10000 root@SERVER-IP and open https://127.0.0.1:10000 on your machine, and close the port completely.
In addition: the System Settings page has an Enroll For Two-Factor item for two-factor login, and the login form has a separate field for the code. The fail2ban package was installed on our server after installation. Panel updates arrive as notifications on the main screen.
Common errors
| Symptom | Cause | What to do |
|---|---|---|
| The installer refuses or breaks on a server with an old site | The system is not clean: nginx, another panel or a database is installed | Reinstall the OS and repeat; do not install on a working server |
ufw answers command not found |
The installer removed UFW and enabled nftables | Rules are in the Linux Firewall module or with nft commands (see above) |
| The site does not open, WordPress shows a database connection error | The MariaDB service is stopped (for example after answering No in the wizard) | systemctl enable --now mariadb |
Let’s Encrypt refused: invalid email address |
The server name is not an FQDN, a non-working address was put on the owner | Enter a real Contact email in Edit Virtual Server and repeat the request |
| Port 10000 does not open | Your IP changed after the port was restricted | Add a rule with the new address over SSH or go in through a tunnel |
WordPress opened at /wordpress |
The default subfolder was left during installation | Reinstall with the At top level option or move the site |
| Processes disappear, the server is slow | Not enough memory | Check journalctl -k | grep -i 'Out of memory'; take a bigger plan |
FAQ
Is Virtualmin free?
Yes, the GPL edition is free and covers typical hosting tasks: virtual servers, databases, Let’s Encrypt certificates, backups and nine application installers, including WordPress. The paid Pro adds graphs, batch operations, backup encryption and more applications.
How much memory does Virtualmin need?
A minimal installation without mail took about 800 MB in our test with a running WordPress site. The full one with mail, SpamAssassin and ClamAV needs, per the documentation, about 4 GB. We did not test on 1 GB; for WordPress a comfortable start is 2 GB.
Can you install Virtualmin on Ubuntu 22.04?
It is not on the installer’s list of systems: there it is Ubuntu 24.04 and 26.04, Debian 12 and 13, and the RHEL family. For a new installation take one of those.
How do you open the Virtualmin panel?
In a browser: https://SERVER-IP:10000 or https://hostname:10000. The login is root. A certificate warning on the first login is normal.
Can you install Virtualmin on a server with a working site?
No. The installer expects a clean system and configures the web server and database itself, so it conflicts with existing ones. Create a new VPS, move the site and switch the domain.
Ready to try? Order a VPS with Virtualmin or a clean Ubuntu on ufo.hosting.
Related
All articles
Nextcloud on a VPS: your own cloud with Docker Compose
Nextcloud is a cloud you own: files synced to your phone and computer, a calendar, contacts, and share-by-link. On a VPS you run it with Docker Compose as five containers: Nextcloud itself, a PostgreSQL database, a Redis cache, a container…

How to Install n8n on a VPS with Docker Compose
You can run n8n on your own VPS with Docker Compose in a single evening: two containers (n8n itself and Caddy, a reverse proxy that issues the HTTPS certificate for you), three small files and one start command. Below you…